Granite Bay Design: Graphic Design and Production
![]()
When Granite Bay Design was tasked with creating a complete set of printed materials for Restifo Plastic Surgery (see the end result of the brochure here), Paul Kazmercyk began the creative process by coming up with various “looks” to see what Dr. Restifo thought would be best for his business as they prepared to move into a newer, modern building.
The project would include a brochure (ultimately with four different covers, each aimed at a specific audience), a set of stationery, and a folder to hold these and other various materials.
You can view pages of the final brochure here.
Overview of the Creative Process
Here are some design concepts as presented to the client. I have always liked brochure and report designs that were a little taller and narrower than a standard letter (8.5″ x 11″) size. You’ll see in subsequent screen shots that we did look at that standard size, but Dr. Restifo agreed with me and the brochure(s) and folder inserts would be 6-5/8″ x 11″ with a folder that was slightly larger to accommodate the elements to be inserted.
![GBD Works Tutorial: Steps in the Creative Process: Restifo Plastic Surgery Folder and Brochure [Step 1]](http://granitebaydesign.com/wp-content/uploads/2023/03/Restifo-Plastic-Surgery-Creative-Process-Tutorial-Granite-Bay-Design-GBD-Works-01.jpg)
Designing the Curve
Early in the design process, I began experimenting with a curved, die-cut. This would eventually become an integral part of the overall design with folder having this shape as a die-cut. The curve shape seemed like a perfect opportunity to factor in the overall theme of plastic surgery and the female form.
![GBD Works Tutorial: Steps in the Creative Process: Restifo Plastic Surgery Folder and Brochure [Step 2]](http://granitebaydesign.com/wp-content/uploads/2023/03/Restifo-Plastic-Surgery-Creative-Process-Tutorial-Granite-Bay-Design-GBD-Works-02.jpg)
Implementing the Curve
Once I had the curve designed, I began working it into some of the brochure and insert elements in progress. The curve used in conjunction with the strong, narrow, horizontal images would become an integral part of all the pieces in the design package. When a photograph spanned the full width of a piece, we looked at making the portion to the left of the curve a little different. In the first and third examples, that left portion is blurred. In the middle design, I looked at making that portion a color block—in this case, a darker blue.
![GBD Works Tutorial: Steps in the Creative Process: Restifo Plastic Surgery Folder and Brochure [Step 3]](http://granitebaydesign.com/wp-content/uploads/2023/03/Restifo-Plastic-Surgery-Creative-Process-Tutorial-Granite-Bay-Design-GBD-Works-03.jpg)
Working the Curve Into the Folder Design
Here you’ll see two early drafts of the folder implementing the curve. At this point in the process we hadn’t yet decided on the taller, narrower design, so these would hold standard letter-size (8 1/2″ x 11″) components. At this stage of the design process, I was still experimenting with different font sizes, colors and positions. The logo was already designed when I took on the process. The curve element that I developed was based on a portion of the logo.
![GBD Works Tutorial: Steps in the Creative Process: Restifo Plastic Surgery Folder and Brochure [Step 4]](http://granitebaydesign.com/wp-content/uploads/2023/03/Restifo-Plastic-Surgery-Creative-Process-Tutorial-Granite-Bay-Design-GBD-Works-04.jpg)
Photography
We began to use some stock images that had the right “look and feel” for the concept of plastic surgery. We would eventually decide to use four different photos, each aimed at a slightly different audience just for the covers. We weren’t yet certain whether or not we’d hire models for the various photos. But, as we began our stock image search, we decided that there were enough very high-quality images available from stock photo services available. The alternative of hiring models and a photographer for more than 20 high-quality images would have been prohibitive.
![GBD Works Tutorial: Steps in the Creative Process: Restifo Plastic Surgery Folder and Brochure [Step 5]](http://granitebaydesign.com/wp-content/uploads/2023/03/Restifo-Plastic-Surgery-Creative-Process-Tutorial-Granite-Bay-Design-GBD-Works-05.jpg)
The Folder and the Pocket Curve
Here’s the basic layout we would use for the folder which would be the centerpiece of the package. Rather than a straight cut for the top of the pocket, I took the curve shape used on the front panel of the folder and reduced it, using that as the top of the folder pocket. Here you’ll also see an early version of the inside of the folder with a list of the plastic surgery options on the inside right panel. You’ll also see an indication of the die cuts used to hold the business cards on the pocket. milfordconsulting.com.ng
![GBD Works Tutorial: Steps in the Creative Process: Restifo Plastic Surgery Folder and Brochure [Step 6]](http://granitebaydesign.com/wp-content/uploads/2023/03/Restifo-Plastic-Surgery-Creative-Process-Tutorial-Granite-Bay-Design-GBD-Works-06.jpg)
Printing Inks Used
While the brochures and other inserts would use standard CMYK (process) inks, the folder posed special challenges. Because you can’t actually print white or any other color over a darker color, we would have to start with white stock, printing the grey background color and “knocking out” the white and other colors. Knocking out an element simply means the solid background (the dark grey) is “subtracted” from the grey plate so what appears as white type on grey is actually the white of the paper stock where the grey doesn’t print. More on that later.
![GBD Works Tutorial: Steps in the Creative Process: Restifo Plastic Surgery Folder and Brochure [Step 7]](http://granitebaydesign.com/wp-content/uploads/2023/03/Restifo-Plastic-Surgery-Creative-Process-Tutorial-Granite-Bay-Design-GBD-Works-07.jpg)
Design Options Presented to the Client and Embossing
Here is just one example of design options presented to the client. There were many iterations of various components of the package that go through several steps, eventually landing on an approach the client ultimately approves. Here we see the first mention of embossing, a process of making a shape “pop out” of a background. The shape that is to be embossed is made from a metal plate. The die presses into the paper stock, raising the paper in the shape of the metal die. Embossed elements often have an ink color or varnish applied to the shape in addition to the embossing.
![GBD Works Tutorial: Steps in the Creative Process: Restifo Plastic Surgery Folder and Brochure [Step 8]](http://granitebaydesign.com/wp-content/uploads/2023/03/Restifo-Plastic-Surgery-Creative-Process-Tutorial-Granite-Bay-Design-GBD-Works-08.jpg)
Color Options and Font Options
This step shows how certain colors and font weights will look on our dark grey background. Left: the folder pocket with the curve and some different color combinations for the business card. Middle: various lighter shades of Pantone (a special type of flat ink with universal formulae used by all printers—as opposed to cyan, magenta, yellow and black process colors) inks on the darker grey background. Right: three versions of the “Museo” font in different weights from light to bold. These steps are for me as much as the client so I can best determine which colors and fonts will work best.
![GBD Works Tutorial: Steps in the Creative Process: Restifo Plastic Surgery Folder and Brochure [Step 9]](http://granitebaydesign.com/wp-content/uploads/2023/03/Restifo-Plastic-Surgery-Creative-Process-Tutorial-Granite-Bay-Design-GBD-Works-09.jpg)
More on Color Options
This is very similar to the step above. Again, this step is as much for me as the client to help me to best determine the look and legibility of various ink colors—in this case, the color of the tagline below the white “Restifo Plastic Surgery” main type. Sometimes, what seems like a good color or font choice, ends up not working. As you’ll see in the right column, I’ve narrowed down my secondary color options. These are essentially the colors used on the printed folder. cadep.com.mx
![GBD Works Tutorial: Steps in the Creative Process: Restifo Plastic Surgery Folder and Brochure [Step 10]](http://granitebaydesign.com/wp-content/uploads/2023/03/Restifo-Plastic-Surgery-Creative-Process-Tutorial-Granite-Bay-Design-GBD-Works-10.jpg)
Preparing for the Printing Process
As we move closer to finalizing the project, the printer and designer look at variables that must be addressed before the job moves into production. In this case, (top) approximately how much of the inserted brochure will show when the right flap is folded in, (bottom, center) a note on scoring for a gusset and how much of the pocket shows when the right panel is folded in.
![GBD Works Tutorial: Steps in the Creative Process: Restifo Plastic Surgery Folder and Brochure [Step 11]](http://granitebaydesign.com/wp-content/uploads/2023/03/Restifo-Plastic-Surgery-Creative-Process-Tutorial-Granite-Bay-Design-GBD-Works-11.jpg)
Photo Options
With most projects that involve stock photography, the designer and client usually review various options to determine what type of image will best suit the project(s). In most cases, I look at hundreds—sometimes thousands—of potential photos. In this case, because of the very specialized nature of the subject matter, I looked at thousands of images from various stock photo agencies. These are just a small sample of images I selected and presented to the client. Ultimately, we would need four very strong cover images and another 20 or so for the inside pages.
![GBD Works Tutorial: Steps in the Creative Process: Restifo Plastic Surgery Folder and Brochure [Step 12]](http://granitebaydesign.com/wp-content/uploads/2023/03/Restifo-Plastic-Surgery-Creative-Process-Tutorial-Granite-Bay-Design-GBD-Works-12.jpg)
Layout Ideas for Other Inserts
Aside from our main brochure, there would also be other inserts that would go into every client package. In this case, here is a layout for a six-panel insert about Dr. Richard Restifo. These layouts show a single version flat (opened) front and back (top) as well as layouts of how the insert would look when folded (bottom). As with all the various components, these layouts were presented to Dr. Restifo for review and/or approval.
![GBD Works Tutorial: Steps in the Creative Process: Restifo Plastic Surgery Folder and Brochure [Step 13]](http://granitebaydesign.com/wp-content/uploads/2023/03/Restifo-Plastic-Surgery-Creative-Process-Tutorial-Granite-Bay-Design-GBD-Works-13.jpg)
Finalizing Various Components
As we moved closer to moving the job into production, I prepared some components for printing. Here is the final, approved version of a business card. Left: a partial rendition of the cards 6-up (ultimately 10-up on a page) in the dark grey. We would also print some cards on white stock (left bottom). The right column shows the final version in the folder pocket. We were considering the curve shape as an element on the card. Bottom right: the final color scheme. Note about engraving: we were still considering engraving the white type, although we ultimately used a “knock out” (KO). See above.
![GBD Works Tutorial: Steps in the Creative Process: Restifo Plastic Surgery Folder and Brochure [Step 14]](http://granitebaydesign.com/wp-content/uploads/2023/03/Restifo-Plastic-Surgery-Creative-Process-Tutorial-Granite-Bay-Design-GBD-Works-14.jpg)
Finalizing the Color Palette
Here we see the final color selections as they would appear on a white background and on our dark grey background (Pantone 425). We would ultimately use a “double hit” (printing the same color twice on top of itself) of Pantone 425 to achieve the proper level of darkness for the “knocked out” elements in white and the other Pantone colors to really “pop” and look sharp.
![GBD Works Tutorial: Steps in the Creative Process: Restifo Plastic Surgery Folder and Brochure [Step 15]](http://granitebaydesign.com/wp-content/uploads/2023/03/Restifo-Plastic-Surgery-Creative-Process-Tutorial-Granite-Bay-Design-GBD-Works-15.jpg)
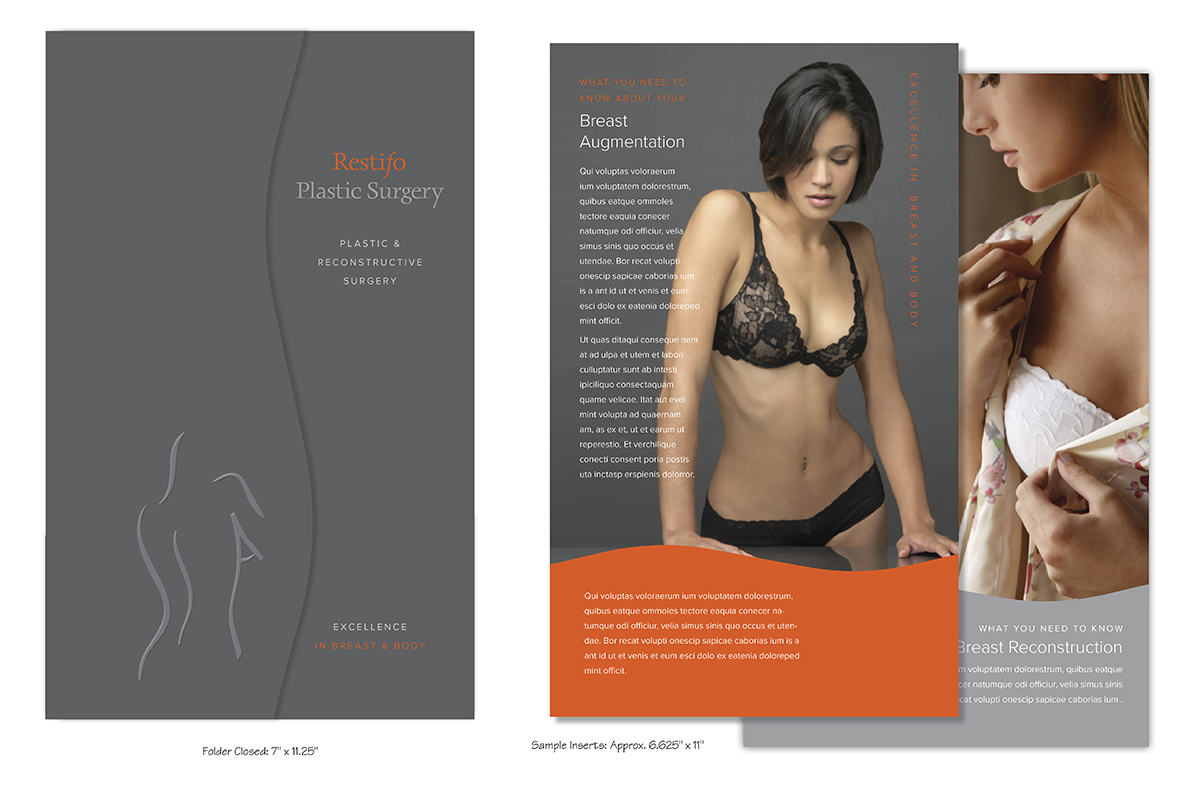
The Final Folder
Here is the file for the final version of the outside of the folder. It seems simple, but, as with many projects, there were a lot of steps in getting to this point. casedarno.it
![GBD Works Tutorial: Steps in the Creative Process: Restifo Plastic Surgery Folder and Brochure [Step 16]](http://granitebaydesign.com/wp-content/uploads/2023/03/Restifo-Plastic-Surgery-Creative-Process-Tutorial-Granite-Bay-Design-GBD-Works-16.jpg)
See pages of the final brochure here
.